söndag 18 januari 2015

Baseflight FixedWing

Latest update 2016-08-21  
Updated links 2021-07-31

How to setup a  NAZE32 and NazeMini
For Airplane and Flying Wings for Return to Launch functions.

NOTE!

The more advanced F3 boards is not supported by Baseflight.


Magnetometer and Barometer is NOT needed for Airplanes.
A Naze32 Acro or AfroNaze  together with a Gps module is sufficient.

Connection diagram for NazeMini


Owners manual from Abusemark


Connection diagram for Naze32


Owners manual from Abusemark


Most settings is available in the configurator.
The Settings for Elevator compensation is not active though it always show zero.
That is still a CLI command if you need to adjust it..

I recommend to install the latest dev for Fixed Wing.
It have all new fixes and functions.
Install it with the Firmware flasher in Baseflight Gui

New Updated Version
Link updated
Baseflight_FW_160622    (right click save as!)

Here's video from Matthew Ogborne where he's testing FW_160622. 
If he had followed the recommended settings his first flights would have been much smoother.


To setup a normal Airplane with  RTH & PosHold

The latest version now  have a simplified setup.
Enter CLI mode in the Gui.

To setup Baseflight for a Airplane
Type preset Airplane and enter.

Or to setup a Flying Wing
Type preset Flying_Wing and enter

Therese commands will change the settings to suitable values to start with.
What remains is to select the GPS and receiver type you are using in the config TAB

Transmitter setup
Use the Receiver Tab in the Configurator and ensure that your transmitter
Send the channels within 1000 - 2000 range and centers 1500.
Failsafe will be triggered if the value falls below 995µs.
The failsafe threshold can be changed in cli.

Soft serial setup
I have not tested soft serial my self but i have been recommended to 
Follow this guide

Failsafe setup

The preferable way to detect a Lost connection is to program the radio to 
Stop sending PPM/PWM signals.
Or to program it to center all channel and trim throttle channel below the threshold value.

Servos

If the Gyro compensate in wrong direction when you move the plane.
Change the direction in the servo TAB.
Endpoints should be set in the Gui and not in the Transmitter.

The parameters for the Navigation.

Max allowed influence from GPS code in degrees.
fw_gps_maxcorr = 20        // Max Roll input from GPS (For Flying wings set to >=30)
fw_gps_maxclimb = 15      // Max Climb input
fw_gps_maxdive = 15       // Max Dive input
fw_gps_rudder = 15          // Max Rudder input if rudder is available

fw_climb_throttle = 1900     //  Limits Throttle during climbs
fw_cruise_throttle = 1500   // Suitable average throttle
fw_idle_throttle = 1300       //  Lowest throttle during Descending

fw_roll_comp = 100             //  How much Elevator compensates Roll in GPS modes
fw_rth_alt = 50                   //  Min Altitude to keep during RTH. (Max 200m)

small_angle  = 180            // Will allow the Plane to be Armed in any position.


GPS modes Need to be activated together with Angle or Horizon modes.


Flight Modes

Passthru = Manual flight Mode
All stabilization is disabled.


Acro = Normal mode
Gyro Stabilization is active..


Horizon = Stable mode
Gyro And Accelerometer To return the plane to level.

PosHold + ANGLE = Hold position mode
Uses Gps to Circle the point where it was activated.

RTH + ANGLE = Return to home mode
Uses Gps to return home.
Starts circling after return 

RTH + ANGLE = Auto Launch mode
Use RTH to launch the plane.
Activate before launching.
Will Climb to RTH altitude and 
Starts circling around home. 


Failsafe RTH = Emergency Return mode
Uses Gps to return home.
Will attempt to land the plane when returned.


Advanced setup of Custom servo mixer

Setup a CUSTOMPLANE

All servos can be programmed with different functions.
Baseflight Gui now have a working servo mixing tab to use.

Before it was supported by Gui i created a simple
Windows App to setup Custom Airplane
Download ServoMixer_CLI.exe    (right click save as!)

Smix = Mixer ID
Servo = OutputServo
Input = Selected source
Rate = % rate and reverse with minus.
Speed = Higher is faster.(3 gives a nice speed for Flaps )
Min/Max = Endpoints 0 - 100 // 50 = Centerpoint
AUX select =  Activate the rule with a AUX switch. zero for always active.


Create new rules
Select Output servo,Input,Rate, Min, Max and controllBox
Press Add to complete.
Add the mixers you need for your model.


Mark a rule to edit it.
Press modify to save the modification.
Organize the list and move rules up or down.
Clear the list or fix the number order with
Reorganize button
Export mixers when done.

Edit the mixers manually before exporting.
You can Copy the text and paste it in Baseflight CLI intercace.

Or select correct Comport and Send it direct to the NAZE board.
Baudrate is set to 115200.
Make sure The Comport is closed and no other programs is
connected.


A CLI window will be shown to verify the communication.
Press Back to close the comport again.
Now you can connect Your Baseflight configurator to NAZE again.

fredag 4 april 2014

Multiwii GPS Airplane

                     updated 2016-07-06 (Updated links)

This is a addon to the
How to setup a Multiwii Airplane

Download the stable 2.3 Version of FixedWing Nav code
Recommended for Flight controllers based on ProMini.(Atmega 328P)

Or the experimental Waypoint version.
Recommended for Flight controllers based on Mega processors.
MultiWii_FW_150431 with failsafe fix
Use with WinGui from EosBandi for setting waypoints.
http://eosbandi.com/downloads/

What to expect from a MWii GPS plane?

The code supports.RTH & GPS-Hold.With the simplest FlightController and a Gps. Perfect for exploring the surroundings with your FPV plane.

A good presentation of RTH mode borrowed from Spencer Trejo

Connection Diagram


GPS-Hold

Can only be enabled With AUX switch.
Check both Angle mode and GPS Hold in Gui.
When GPS-Hold is activated The position is saved in a 3D Waypoint.
The plane will Navigate and try to "hit" the WP continuously and maintaining altitude.
No pattern is programmed and the plane fly the shortest way back.
Often in a circle or figure eight.


RTH (Return to home)

Can be enabled With AUX switch or by Failsafe.
Check both Angle mode and RTH in Gui.


When RTH is activated the plane will start Climb to reach safe Altitude.
If RTH is enabled Higher than set altitude it will start navigation and keep that altitude.
If altitude is safe the plane will start to Navigate to home Position.

Only use Angle/Horizon + Gps Home/Hold together.
Do NOT Activate BARO Or MAG for navigation.
It will interfere with the navigation code.

When the plane reaches SAFE_DECSCEND_ZONE the plane will begin descending to correct altitude.
The plane will keep flying in hold mode and continuously pass home.

If Failsafe is active at return The plane will Disarm motor and descend to a "Landing"


PID settings is made in Gui.
ALT & NavR.

Return Altitude can be set with
PosR D-parameter.
Scale is in km...
50m is set as defaut.
250m is Max.


=====================================================
This settings is done  in  Config.h .
=====================================================

#define MAXTHROTTLE 2000 
Because you  want Full Power sometimes!

Select your GpsType

In My case
#define GPS_PROMINI_SERIAL    115200
#define NMEA
Or 
#define I2C_GPS


Failsafe function

#define FAILSAFE
The obvious reason to have GPS in a plane!
FAILSAFE can take over the plane and fly it to Launch point if the Radio is lost.
When Home is reached the plane will stop motor and attempt to make a "Landing"

If Transmitter sends commands below 980µs Mwii will enable Failsafe!
Angle and GPS_HOME become activated.

If you can program failsafe function
on your Receiver Program throttle
To Below 980µs
Or set the switches for RTH.


Safety settings...

#define MOTORSTOP
Give you the chance to Cut motor off with the Throttle Stick.
If Throttle is lowered to zero motor will stop.
Nice when doing preflight checks

Warning...
If you stop motor during Navigation the plane Will most likely Stall!
There is a small protection programmed but it might not be enough.
(Common Aviation Physics...)

=====================================================
This settings is temporarily  in  Gps.h .
=====================================================
The following settings controls the behavior of the plane during Navigation.
Default settings gives quite soft characteristics.

This values can be set to Zero if Ex Rudder is not used.
#define GPS_MAXCORR    20  // Degrees banking Allowed by GPS
.#define GPS_RUDDER        15  // Maximum Rudder

#define GPS_MAXCORR    35  // Is Suitable for Flying Wing.

#define GPS_MAXCLIMB   15     // Max allowed Degrees climbing . To much can stall the plane.
#define GPS_MAXDIVE      15     // Diving . To much can overspeed the plane.

A Flying Wing usually need  around 30 - 40 degrees Maxcorr to tighten the turns.

#define CRUICETHROTTLE    1600
The vale  Throttle keeps when Altitude is correct for "Long Distance".
Should be set to a comfortable speed well over Stall Speed.

#define IDLE_THROTTLE      1300
When the plane is descending this is the lowest allowed Throttle.

#define SAFE_NAV_ALT        20  // Meters
To avoid  trees & buildings etc The plane will make a climb straight forward before Navigation starts.

#define SAFE_DECSCEND_ZONE  50 // Meters
 Radius around home where descending is OK

Note!...Don't forget the pre launch check!...

After takeoff, test RTH to ensure Home is set correctly before Going on a FPV mission

A bonus feature With RTH (Autolaunch)

If you enable RTH on the ground before Takeoff.
The plane will perform a full RTH cykle.
Climb, return and start circle....

Odd behavior on Rudder

Rudder have a tendency to try to hold the heading during Aileron/Elevator turns.
It can make the plane fly Sideways and other strange phenomena.
The cure is to Set YAW_I = Zero.

=====================================================

A example for a simple setup for RTH

FlightController  < $25
GPS module      < $20

A complete AutoPilot capable to save your plane  under 50$
I'm sure you can find even cheaper setups if you search on Ebay.

=====================================================


torsdag 26 april 2012

Multiwii Helicopter


How to setup a Multiwii Helicopter
                     updated 2012-05-14
            (New way to setup the Swash mixer)

This Guide is not fully uptodate to V2.3.
In general it is correct but most servosettings can be configured from Gui now.

Same Hardware as a MultiWii copter.
Arduino PRO MINI. 5V 16MHz or Arduino  Mega.
- Gyro Ex Nintendo Wii motion plus.
- Accelerometer.
Acc only needed forAutoleveling.


The code can handle 120 & 90 degree heads.


Connect servos to the Arduino.


 If you use a Mega Board you need to comment
//#define MEGA_HW_PWM_SERVOS
Otherwise Servos will be different pins


Connection diagram 120°


Connection diagram 90°


Setup Transmitter
Set TX channels to full rates it shoud reach between 1000-2000us in the Gui.
Correct the servo directions in the TX.


ServoMixer
In config.h
     // Servo mixing for heli 120  Use 1/10 fractions (ex.5 = 5/10 = 1/2)
    //                                        {Coll,Nick,Roll}
    #define SERVO_NICK    { +10, -10,  -0 }
    #define SERVO_LEFT    { +10, +5, +10 } 
    #define SERVO_RIGHT { +10, +5,  -10 }  
    Invert each function by change from + to -.
    The parts of the mixer is. ( Collective , Nick , Roll  )
    Adjust the Nick mixing so swash don't move up or down when tilting.


   // Servo mixing for heli 90 
   //                                                     {Coll,Nick,Roll}
   #define SERVO_DIRECTIONS {   +1,   -1,   -1   }          // -1 will invert servo


!! Important Note !!
In versions after dev-06-04 there's been a change.
It's effecting GyroSmoothening and Servo_offset.
If you change any of the values in the ConfigFile The RESET button in the Gui
must be pressed before the changes will be applyed!.


 Swash Angels
    Adjust the midpoint offset to trim the swash level.
    #define SERVO_OFFSET     {  0,   0,   0,  0,   0,   0,  0,   0 }
GyroSmootening
Helicopters is known to create lots of different vibrations.
If the gyros feels oversensitive (Hysteric) Try smoothing.
#define GYRO_SMOOTHING {20, 20, 3} // separate averaging ranges for roll, pitch, yaw.
Values must never be below 1.
Increase the values untill it feels right.

The most settings is done  in  Config.h .
*********************************************************************************

// Channel to controll CollectivePitch
#define CollectivePitch AUX1   // Selectable channels: ROLL,PITCH,THROTTLE,YAW,AUX1,AUX2,AUX3,AUX4

// Set Maximum available movement for the servos. Depending on modell.

#define SERVO_ENDPOINT_HIGH {2000,2000,2000,2000,2000,2000,2000,2000};
#define SERVO_ENDPOINT_LOW  {1020,1020,1020,1020,1020,1020,1020,1020};

// Limit the range of Collective Pitch. 100% is Full Range each way and position for Zero Pitch
#define CollectiveRange { 80, 1500, 80 }    // {Min%, ZeroPitch, Max%}.
#define YAWCenter             1500       // Use servo[5] SERVO_ENDPOINT_HIGH/LOW for the endpoits.

#define YAWMOTOR                0       // If a motor is use as YAW Set to 1 else set to 0.

// Proportional throw for Roll & Nick  in 0-100%  or more.
#define ControllRange   { 100, 100 }      //  { ROLL,PITCH }

NOTE!
All changes made to settings to servos in config.h...
Require that you press reset button in gui to accept from config.h
********************************************************************************
SERVO_ENDPOINT
Will limit the absolute maximum servotravel.
Should be set to stop servos to travel to far.
You dont want to stall the servos.

Servos
Totally 8 servos is available.
Default mix uses.
3 Swashservos
1 YawServo (alt. esc for Yawmotor)
1 Trottelservo or esc.
There's 3 free servos to use. A0,A1 & A2
For use of a gimbal or other functions.
The mixes in outputfile can be modified for more advanced setups.

Passthru
Sends Rc commands direct to servos.
Not recomended on a FBL!...

GyroMode
The model should feel stable but can still be flown advanced.

AccMode
Levels the model when sticks is in center.
LevelMode also limits how much the model can tilt.

Preflight setup
After you have changed the servoRates in the code
you can set Dualrates, Expos and curves in the Transmitter.
Engine must be Armed to prevent motorstart by accident..
Should be Armed from AXU-channel if it's setup in the gui (KillSwitch)
Or with stick combination min throttle & max rudder.


First Flight.
Take of in Passthru.
Switch mode on safe height.
Activate Assisted modes and feel the difference.
Initial settings for my first testflight.

Level-P value will Reduce the maximum throw in Level-Mode.
P=9 Will give similar throws as Gyro-Mode.


tisdag 6 mars 2012

Multiwii Airplane


How to setup a Multiwii Airplane and FlyingWing
                     updated 2014-10-18


Airplane uses same Hardware as a MultiWii copter.
Arduino PRO MINI. 5V 16MHz, ProMicro or Arduino  Mega.
- Gyro
- Accelerometer
- Mag (Optional)
- Baro (Optional)

Start with a trimmed suitable plane.
Dynam EZ-Hawk was my choice but any airplane will work.


Connect servos to the Arduino.
To use D7 on Mega boards you need to use MWii V2.4

And in Config.h comment
//#define MEGA_HW_PWM_SERVOS
Otherwise Servos will be on different pins look in config.h for pinnout info.


My Installation
Sensors work best if mounted as close to CG as possible.
I use multiple layers of double-sided foam tape.


This picture is old and need  to be Updated.

******************************************************************************** 
Setup Transmitter
Set TX channels to full rates it should reach between 1000-2000µs in the Gui.
Failsafe function will recognize it as abnormal input if Rates reach below 1000µs .

 If you push both sticks in upper right corner all channels should show 2000 in gui.
Correct the servo directions in the TX.
Results is the same in both Mode1 & Mode2


******************************************************************************** 
Setup Servos
Gyro or Acc assisted Mode.
Check if Gyro move servos in right directions.
Lift a wingtip and Aileron goes up.
Lift the tail and Elevator goes up.
Rudder moves in same direction as the tail.

 Use the Servo Tab in Gui to Change Servo directions.


The Servo Tab looks a little different for FlyingWings.
Servos connect to same Wing Servo pins as the Airplanes
Adjust Midpoint and the endpoints.
The elevons can be reversed for each function.


Setup in PassThru Mode.
Set all TX trims to zero and check the value when the sticks centers.
If it's not 1500 change #MIDRC to your Midrc in the code.
* Use the Servo Tab in Gui to adjust  Servo Offset to center the Control Surfaces.
   Adjust mechanically on the linkages to keep offsets as small as possible.
* Set the Servo Rates to maximum recommended for the model.

Remember to press Save button before exit!..


It's also possible to export the servo settings.
Press the Save to file button to save Servos.txt in
same folder as MultiWiiconfig.exe

This settings can be pasted in Config.h and you will not loose
the settings if you reset PID's.

******************************************************************************** 

Issues With Rudder


If you experience weird function on the rudder.
And the rudder "Drifts" and becomes offset in gyro and Level modes.

Rudder have a tendency to try to hold the heading during Aileron/Elevator turns.
It can make the plane fly Sideways and other strange phenomena.
The cure is to Set YAW_I = Zero.

******************************************************************************** 

The settings is done  in  Config.h .
=========================


#define MAXTHROTTLE 2000 
Because you  want Full Power sometimes!


Mwii uses 1850 for MultiCopters.


Flaps Settings
Conventional Flaps
Using servo[2]  (A2 on ProMini )
//#define FLAPS                         // Enable Flaps .

Select channel to control flaps
with the AUX buttons to the left.

Set endpoints and direction.


Flaperons
//#define FLAPPERONS          AUX4              // Use Aileroins as Flaps .
#define FLAPPERON_EP   { 1500, 1700 } // Endpooints for flaps on a 2 way switch
#define FLAPPERON_INVERT             { 1, -1 }       // Change flap direction

Make flaps move slow Higher value is Higher Speed. Effects Both types of flaps.
//#define FLAPSPEED     3            
********************************************************************************

Flaps (Flaperons)*
Select a channel to control your flaps with.
Endpoints is the preprogrammed positions for the flaperons 


Endpoints for flaps can also be programmed in the TX .
Then set FLAP_EP  { 1020, 2000} in the code.


Servos
Totally 8 servos is available.
Default mix uses.
2 Wing servos
1 Elevator
1 Rudder
1 Throttle servo or esc.

A0 & A1 can be used for a gimbal.
A2 Is used for conventional Flaps or Camera trigger.

Acc Calibration

Place the plane on a stable surface.
Vings Level with nose in expected Attack angle for level flight.
Normally a few degrees up.
Memorize the planes  attitude in flight this should be Level for Acc.


Passthru
Sends Rc commands direct to servos.
No influence from sensors.

Gyro Mode (Acro)
This is "Normal" mode when nothing else is selected.
The plane should compensate for movements. (Wind Gusts etc)
The plane feels stable and locked in but still able to loop & roll.
Stall speed is lower and it can be necessary to "Push" it down in landings.

Stable Modes
  With the sticks centered the plane will self stabilize.
  Returning to level flight from almost any situation.
  Provided there's enough Altitude for recovery.

Horizon Mode Allows rolls and loops. Levels with centered sticks
 This is a comfortable flight mode for FPV.

Angle Mode also limits how much the plane can tilt.
 Gives a Stiff feeling and is only recommended for beginners.

Preflight setup
After you have changed the servo Rates
you can set Dual rates and Expos in the Transmitter.
Engine must be Armed to prevent motorstart by accident..
It can be Armed from AXU-channel if it's setup in the gui . (recommended)
Or with stick combination min throttle & max rudder.


First Flight.
Take of in Passthru.
Switch mode on safe height.
Activate Assisted modes and feel the difference.

Level-P value will Reduce the maximum throw in Level-Mode.


GyroSmooting
If the gyros feels very sensitive (Hysteric).
Activate LPF filtering for the gyro. 42 Hz or lower is a enough for planes.

In bad cases use GYRO_SMOOTHING 
#define GYRO_SMOOTHING {20, 20, 3} // separate averaging ranges for roll, pitch, yaw.
Values must never be below 1.

(*)
Flaperons:
A mix where ailerons also works as flaps  for simpler models without separate flaps.

måndag 2 januari 2012

BlueTooth module

How to set up a BlueTooth module

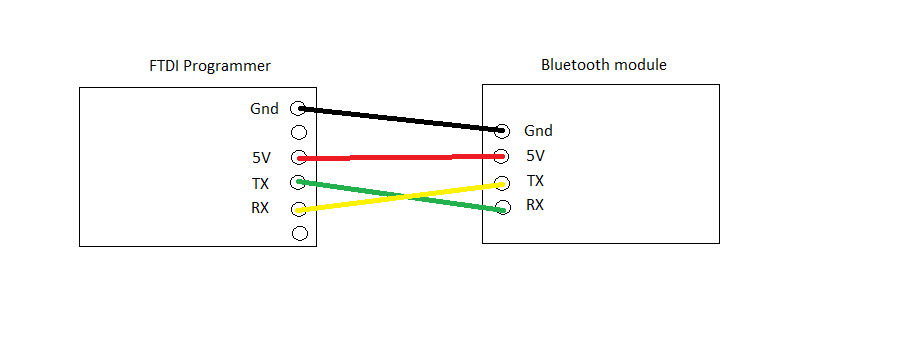
Connect The BluetoothModule to the FTDI porgrammer
TX  to RX  between the modules

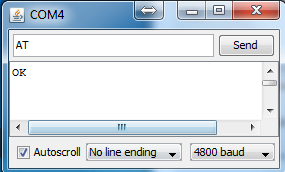
I use Arduino Serial monitor and set up COM port number and ex. 4800 BAUD
Check if module responds
Print AT and press send.Response is OK


Change BaudRate on module
Print AT+BAUD8 and press send.Response is OK115200

1----1200
2----2400
3----4800
4----9600
5----19200
6----38400
7----57600
8----115200

Change portspeed to 115200

Change Name on module
Print AT+NAMEQUAD and press send.Response is OKsetname


Change PinCode on module

Print AT+PINxxxx and press send.Response is OKsetpin


/Patrik

onsdag 7 september 2011

HeadTracker For Dummies

HeadTracker Based on MultiWii.
Updated 16-06-28 with  New links to source code.
Headtracker code based on v2.1
Headtracker code based on v2.4
Make your own headtracker.


Things you need:

Arduino PROMINI or MEGA
Gyro
Acc
MAG is optional
Easiest is to use any of the SensorBoards or All in one available in the project.
Find information how to connect to MWii.


Operation without MAG
Tilt the head sideways to rotate the camera..
Up & Down for Nick...
If you use a MAG just look to around...
Reset MagZero by resetting the arduino.

Setup....
In the HT-file:
Select What Pin you want to use as PPM out.
#define PPM_Out 10 // Any PWM_pin : 3, 5, 6, 9, 10, eller 11
10 is default.

#define NumCannels 2 // Number of Channels To Transmitter

What channels do you want to use the Controol on.
#define PanChannel   1 // TX-Channel to injekt PAN
#define NickChannel 2 // TX-Channel to injekt TILT

Amplifiers:
Adjust the Amplifiers to make the camera move natural.
Increase multipier untill it feels natural.
Adjust to get a natural feeling on PAN,TILT
Change between Positive & Negative to reverse direction on servos
PAN_AMPLIFIER 6 // Increase to make more sensitive
TILT_AMPLIFIER -5

If MAG is used, turning 20 degrees on the head will give full throw on the Pan servo.
Change the value to get a natural feeling.
COMPASS_AMPLIFIER 20


In Config.h
Adjust the endpoints and center in the Cam Stabilisation section.
#define TILT_PITCH_MIN 1020 //servo travel min, don't set it below 1020
#define TILT_PITCH_MAX 2000 //servo travel max, max value=2000
#define TILT_PITCH_MIDDLE 1500 //servo neutral value

#define TILT_ROLL_MIN 1020
#define TILT_ROLL_MAX 2000
#define TILT_ROLL_MIDDLE 1500


Connect to TX Trainerport:
My radio(TGY 9X) have 3,5mm stereoplugg as trainerport.
connect the centerpin to PPM_Out on the arduino and ground to inner "ring"

Connection diagrams can be found for most brands here.
http://www.mftech.de/buchsen_en.htm

Make a DIY StandaloneTransmitter.
It's possible to connect PPM_Out direct to a TX-module.
PPM_Out to ppm input on the TX-module.
+5V and ground.


On a FrSky Diy-module I soldered a sevocable then it's easy to connect it to the Arduino.
Everything must be connected to Common ground!

Arduino and sensors can be powered from a 5V source.
Modules is usually provided with 5V from the radio.
Then everything can use same battery.

This is how my JR TXmodule is connected.


If the module need higher voltage You must keep the common ground.
Otherwise it will not work.

"PreFlight" setup
A0 & A1 Works as servooutputs (Can be used at trimming)
The Pan/Tilt can be connected direct to A0 & A1 on your HeadTracker unit.